For Event Information shared between Sales and Purchasing see Data > General Event Information
Line Item List

The 1 represents the order of the line items.
Item – The number and name of the product selected, can also have
Delivery Option – A drop down of Carry, Pick Up, and Delivery, all but carry will be pulled on to a Work Order after a POS Sale is finished
The 3 bars, ‘Hamburger’ opens line-item details, see Sales > General Event Information > Line Item Popup > Details
The leaf opens the “Age of Bloom” selector allowing someone to bypass regular inventory selection.
Qty – The quantity of what is being sold.
3 dots, opens a menu if applicable.
UOM – the unit of measure of the item that is being sold, defaults to Base Unit of Measure from the product
Del Charge / Surcharge – Shows the delivery charge and surcharge of the line item
Unit Price / Discount – The unit price and discount of the item, clicking on each opens an editor, discount is a percentage between 0 – 1 and discount does not apply on delivery charges.
Subtotal / Tax – the Subtotal and tax of the line item
Group – Used on Quotes for grouping items, comes from Quote templates.
Source – Where the inventory for the order is to come from, Stock Transfer or Procurement
‘Trash’ – this icon will remove the line from the order.
Warehouse – The location where the item is sold from, and where the inventory will be taken from
Product Selection

Wand Icon – The wand icon opens a popup with a list of current inventory.
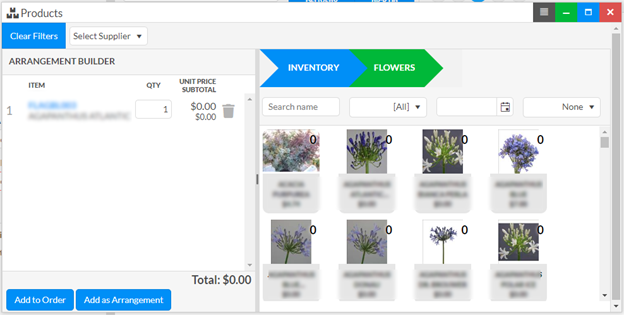
Clicking on the products in the right pane will add 1 quantity to the left pane and the list in the left pane can then be added to the order as separate items “Add to Order”, or as the recipe items of a carry arrangement via the “Add as Arrangement”, see Settings > Settings – General > Combined Product for product used as arrangement.
Magnifier Icon – Opens the grid of products for adding onto the order, double click.
Autocomplete – Allows the searching of products by UPC, Product #, Lot Barcode
Delivery Option Buttons – Adds a blank (no product selected) line with the desired delivery option so that delivery details can be gathers before an item is decided on.
Total Section
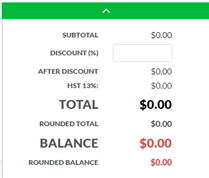
Subtotal – The subtotal of the lines with any line specific discount
Discount – a discount that applies to the whole ordered, entered as a decimal 0 to 1.
After Discount – The subtotal after all discounts
List of Taxes – Shows a list of the applicable taxes, with Rate and amount.
Total – the total of the order
Rounded Total – The total of the order rounded to 5¢, when applicable
Balance – The remaining balance of the order after payments taken.
Rounded Balance – The balance of the order when no penny rounding is applied.
Credit Limit – Set on the Customer > Finance Tab, the maximum amount they are allowed to owe.
Amount Used – Current amount the customer owes
Credit Limit Exceeded – shows when the customer has exceeded, or will exceed their credit limit
Receivable Balance – The amount owing to A/R after any payments have been made.
Payments Screen
Clicking the ‘Apply Payment’ button at the bottom of the total section, when applicable will open the Payment Screen
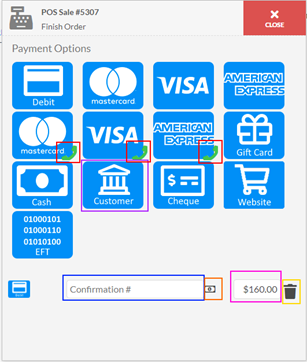
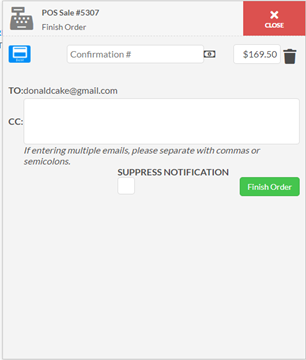
The first image shows an unpaid order, not you cannot finish the order, each of the blue buttons is a payment/tender option, circled in purple, the payment options with the green phone, circled in red, will access the payment gateway if setup and will allow you to charge a customer’s credit card. The various payments that have been applied to the order will appear below the tender options, here you can change the payment amount, magenta, set a confirmation number, blue, delete the payment the trash icon circled in yellow or have the payment finish off the order, orange. Once the balance is zero, or in the case of penny rounding and all cash payments the rounded balance being zero, the order can now be finished.
Now the second image shows an order ready for finishing, the payment options will disappear, the receipt email form and the ‘Finish Order’ button will appear. The To is pulled from the customer’s contacts, the CC allows the receipt to be sent to others, you can also have it not send an email via the ‘Suppress Notification’ checkbox. The finish order will close the Sale and create any work orders if necessary.
Line-Item Popup
Details
Recipient – The recipient of the package and their address and contact information
Recurring Address – A location that you often send to that is not the actual recipient of the item merely where the recipient will be, such as a church, hospital, or funeral home
Send to Address
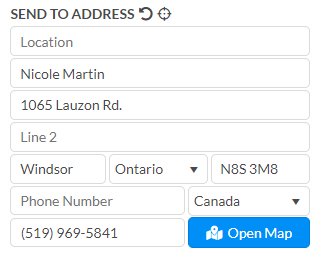
Address has not been hooked up to address autocomplete via CanadaPost.
- Location – When the address is a place such as a hospital or church etc.,
- Care Of – Who the item is for, 2 lines for general address information, a line for
- City
- Zip / Postal Code – Changing the postal code will set off the search for the Delivery charge, in addition when setup with google, it will try to pull latitude and longitude, when those are not set the bullseye icon in the label will have a red slash through it, when filled in the slash will be gone and on hover the coordinates will be displayed. The bullseye icon can also be used to pull the coordinates again.
- Phone Number
- Cell Number
- State/Province
- Country
The refresh icon uses the recipient and recurring address to build the address from them, Recipient name in the care of, the recurring address name in the location, with the address information of the recurring address.
Campaign – A dropdown for active campaigns
Time of Day – The time of day for the order to be delivered, adds a default surcharge that is set on the list, AM, PM, All Day etc.
Delivery Surcharge – The surcharge of the delivery, based on time of day of the delivery. Not affected by Discount
Delivery Charge – The amount to be charged to deliver to the Send To Address, can be route based, or zone based. see Settings > Delivery Charges for setup Not affected by Discount
Due On – Defines that start of the delivery period, defaults to today
Due Date End – Defines the end of the delivery period, defaults to today
Relationship to Customer – The relationship between the selected recipient and the customer on the order
Due Time – Defines the start of the daily delivery period, defaults to 8am
Due Time End – Defines the end of the daily delivery period, defaults to 5pm
Occasion – The occasion, e.g. Anniversary, that the person is ordering for, will ask if you want to add this as an event on the recipient
Ribbon Message – The message to be printed on a ribbon, commonly on funeral arrangements
Card Message – The message for the card that is attached to the arrangement.
Recipe
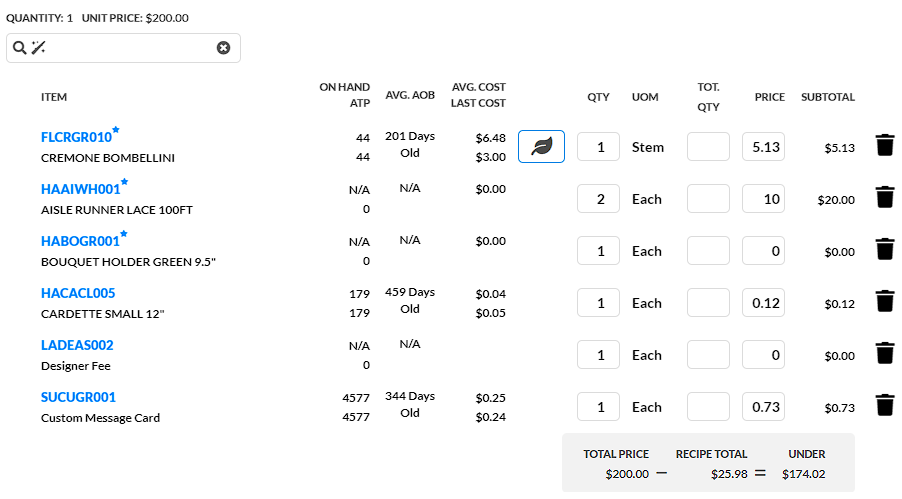
Item – Product Details
- Star – the item is not part of the products base recipe
- Square Refresh – A product that replaced a placeholder item, click to choose another similar item
- Stopwatch – Placeholder item, must be replaced for inventory, click to choose an inventoried item
On Hand – Amount in inventory
ATP – Available to Promise
Avg. AoB – Average Age of Bloom
Avg Cost – Average Cost of the item
Last Cost – The cost from the latest receipt
Qty – Quantity, use for inventory, multiplied by the quantity of the line item for inventory
UoM – Unit of Measure
Tot. Qty – The total quantity to be used in inventory, overrides the quantity calculation above, only available on Work Order
Price – Sale price of the item, changeable to handle variable priced items like labour line
Subtotal – Subtotal of the sub items sale prices
Activity
Production
Punch In/Out
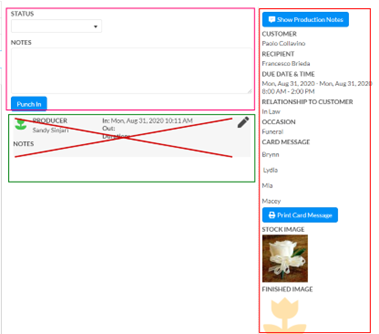
The production punch screen is 3 sections
- Pink – is where a user will punch in and out of the various statuses, the notes are only available when punching out
- Green – is a list of the punches attached to the item, this allows you to check the progress as well as edit punches, with permission. A cancelled punch will have a red ‘x’ through it. The pencil icon on the right of each punch will open the edit window.
- Red – This section has specific chosen information from the details screen along with a link to the activity tab that will filter to production related notes
Edit Punches
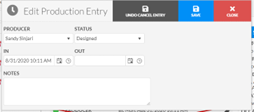
Editing punches is allowed with the ‘Production Punch Admin’ action, this allows you to change and information, finish and cancel punches.
Delivery
Punch In/Out
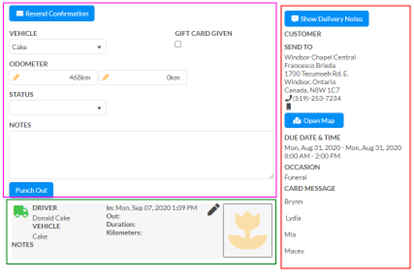
The delivery punch screen is 3 sections
- Pink – is where a user will punch in and out of the various statuses,
- the notes and status are only available when punching out.
- The vehicle will set the starting odometer and the finishing odometer is only on punch out, the yellow highlighter will select all of the text in the input.
- Green – is a list of the punches attached to the item, this allows you to check the progress as well as edit punches, with permission. A cancelled punch will have a red ‘x’ through it. The pencil icon on the right of each punch will open the edit window. The yellow flower will hold the punch image, only available to set through the mobile app.
- Red – This section has specific chosen information from the details screen along with a link to the activity tab that will filter to delivery related notes and to a google map of te address
Edit Punches
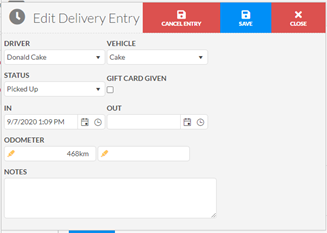
Editing punches is allowed with the ‘Delivery Punch Admin’ action, this allows you to change and information, finish and cancel punches this will not change anything, like the Fleet Asset odometer reading, or notes and will not send out an email. This does not allow for changing the punch image (for the moment).
