Grid

The grid shows a list of all unpaid payables and unused payable credits, grouped by supplier and allows one to select them to pay them.
Circled in purple are filters that will filter the receivables that show, the magnifier will open the supplier grid to filter by suppliers
Circled in red are the checkboxes to mark the items to be paid, the check beside the customer name will select all payables for the supplier
Circled in blue is where the amounts are displayed the columns represent days old
Finally circled in pink is the button that will open the Batch Payment window that gathers all the transaction selected to be paid, and allows the payment of them, when paid all in the same method
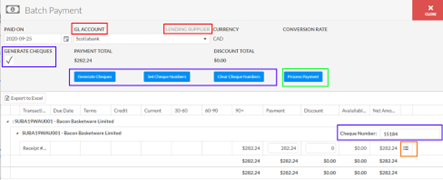
Batch Payment

In red are the available ways to pay off the payables, first choosing a GL account, the other a lending supplier (which has a GL account attached).
To pay via cheque select an account, check the Generate Cheques checkbox, in purple, and the buttons will appear to allow you to generate the cheque to print off, Set cheque numbers, and Clear Cheque Numbers. You must generate the cheque pdf before the Process Payment button will reappear.
Generate Cheques – Will generate a pdf that can be printed on cheque paper, will cause the Process Payment button to appear.
Set Cheque Number – Will fill in blank cheque number fields, to the right of the supplier, based on the first number in order
Clear Cheque Numbers – Will clear out the cheque number fields, to the right of the supplier, so they can be entered manually or reset
Payments are in the payment column and can be changes to the exact amount to pay, the discount box beside it works similarly but instead will use the default discount account to pay off the payable, box are totaled in the grid and in the form above. Each payment can get a memo added by clicking the list icon circled in orange
Process Payment finalizes and applies the payments to the transactions
